
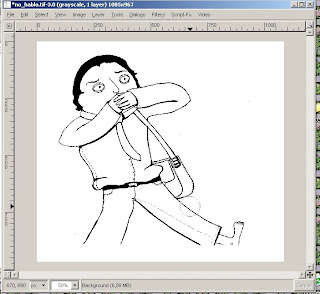
Preparing the image
Prepare the image in Gimp. Open gimp, crop you image to desired length and height. Then we have to create a black border. This border helps to delimit you image which will be useful when coloring with Inkscape. How to create the border around the image. Select all, shrink to 5 pixels and then invert selection, create a new layer aver active layer, and fill with black.

 Using Inkscape
Open your image, prepared with GIMP, in inkscape. Your image should be in a format compatible with Inkscape, such as gif or tiff. XCF the native format of GIMP will not work with present versions of Inkscape.
Your are in Inkscape now and have dragged the image created in GIMP into Inkscape main window. Create the vector image by tracing the original image.
 This is more or less the characteristics of the tracing process. Experiment and see the preview image. Then click OK and close the window [It keeps open if do not].
The vector image
Now you have a copy of the image which sits on top of your original image. Select it by clicking in any black part and dragged it side by side. Now we have to separate the different paths and shapes of the image to color it. Select the new generated vector image and break paths apart.
 Go to Path/Break Apart/
 Then the image looks like it disappeared. The truth is that the paths composing the image went filled in black.
Now you can select the different paths and start coloring by clicking the color palette that is at the bottom. How can I select something i cannot see?
You have an outline view mode as well you can use to click the paths and shapes.
 Outline mode view of the vector graphic.
I made a copy by the side or you can keep the original image to know what you have to color.
Clue: When the image is broken apart, all paths become selected as a result of the process. You can now, deselect the black path by clicking on top of it with shift pressed. Then fill with white.Coloring the image:
Select the discrete paths and color them by selecting the desired colors in color palette at the bottom.

Use the original image to have an idea where the paths are and how to fill them with color.

Use the zoom in difficult parts.
 A good idea is to group paths that cover similar entities, such for example the eyelids, which may be the same color.
Saving and exporting
Now that you are ready. Save the image in the native format of inkscape, svg, a vector graphic file.
 To export the graphics in png format, press export. Do not forget to select what you want to be exported, or use the other features.
A good idea is to resize the document view to fit the selection. This will allow that only the content selected will be seen in the SVG format.
 Final image and comparison with original image:
Credits
Download Inkscape and Gimp in many platforms:

Esta obra es publicada bajo una licencia Creative Commons.


No hay comentarios.:
Publicar un comentario